
The 24-bay SFF (2.5 inch) form factor server saga continues in part 2 of the Dell R730XD Homelab Build.
Disclosure: Certain posts may contain affiliate links, meaning I will receive a commission if you decide to purchase through the links I provide.
I installed the NVME enablement card alongside the non-dell Mini SAS cables and the four Intel P4510 1TBN U.2 NVME SSD's I mentioned purchasing in part 1 of the build which you can read here.
Installing Proxmox
I set up the Micron M500 960GB SSD's (eBay Link) in a RAID1 configuration to be used as my Proxmox installation. In the event one of these SSD's dies, the other one will continue working and the Proxmox data won't be lost giving me time to replace that drive. You can use any SSD but I'd recommend sticking with something like Micron as you can get them used for $20-$50 depending on size through eBay. If you have money to throw away, buying a brand new Intel Enterprise SSD through Amazon (link here) for $200+ is always an option as well. You can technically skip the RAID configuration altogether if you'd like to utilize ZFS on the disks that Proxmox will be running on, but in my specific use case I chose to use the hardware RAID controller (Perc H730 mini) as I'm only using these disks for Proxmox. The remainder of my virtual machines is running (at the time of writing this) on my U.2 NVME's and PCI-E storage.
Installing Proxmox is pretty straight forward. You download the ISO image and put it on a USB (through Rufus or another USB ISO creation tool) and plug it in to the server and then boot from the USB to initiate the Proxmox installation. If you need a nice guide to follow, I recommend checking out the Proxmox installation guide from Proxmox.
The graphical installation is pretty easy to follow, you select the disks you'd like to install Proxmox on, select the appropriate country, time zone and keyboard layout and set up your root password and email. From there, you will set up your management network configuration and hit Install. My management network was actually set up to be used once my pfSense virtual firewall was set up.
Storage Configuration
My storage configuration is a little bit weird out of a necessity more than anything else. I wanted to play around with different disk options and test performance in different guest operating systems. I had set up my 3.2TB PCI-E drive (that you can also get from eBay here) as an LVM disk with no GPT partitioning. These PCI-E drives have so much endurance that you would have to try really really hard to get them to fail on you. My four 1TB U.2 NVME disks (that I mention in part 1) are all set up but only one is being actively used at the moent. The one I am using is set up for LVM usage with no GPT partitioning.
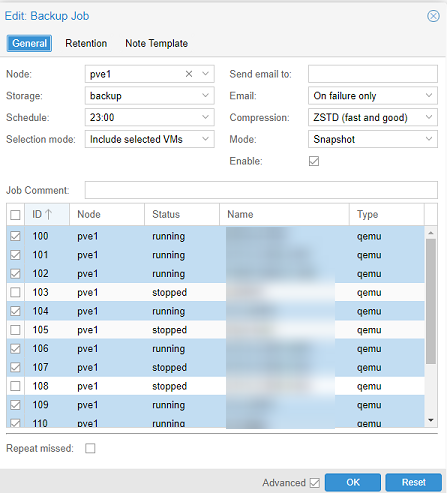
I've also populated drive bays with 1.8 TB 12G SAS 2.5" drives that I put into a RAID and am using stricly for backups of virtual machines running on NVME. This disk is set up in proxmox for ext4 usage with no GPT partitioning. My backup job is configured to run at 11PM every day with a retention limit that keeps the last 15 backups of all selected virtual machines. The backup job also keeps 14 daily backups, 1 monthly backup, 4 weekly backups and 1 yearly backup. You can see the backup job in the screenshot below:
Networking
When it comes to networking, I decided to use PFSense on a virtual machine that runs on the same Proxmox host. My host is set up with three vmbr's (Linux Bridge mode) two of which tie in to physical ports. The vmbr's are also attached to the pfSense virtual machine and that controls all the traffic and firewall rules as it relates to LAN and WAN traffic. The physical ports that correspond to the vmbr's are actually part of my 10GB network card that I installed in the server. The network card I'm using is an Intel X540-T2 with dual 10GB Ethernet ports (you can buy it on eBay by clicking here).
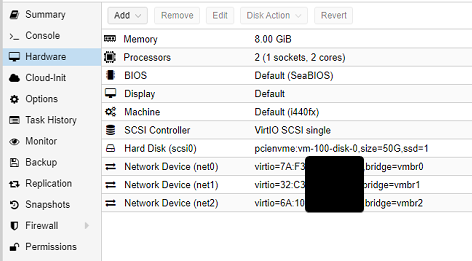
I've assigned 8GB of RAM, 2 CPU's (1 socket, 2 cores) and three network devices to my pfSense virtual machine. You can see a screenshot of the hardware tab for pfSense below:
The configuration of pfsense is probably best reserved for its' own post, but there are a lot of guides available online that can point you in the right direction and help you configure everything correctly for your own use. You can get pretty granular with your networking through the use of VLANs on the pfSense firewall and segregating different virtual machines from one another.
As I use Proxmox more and more, I'll probably create more specific guides about specific virtual machines and configuration options.